QuickBooks Bookkeeping for Amazon FBA & Shopify | Thelonex


How Do You File a GST/HST Return in QuickBooks?
- Home
- How Do You File a GST/HST Return in QuickBooks?
- July 19, 2026
- 5 min read
- No Comments

How Do You File a GST/HST Return in QuickBooks?
Filing a GST/HST return by hand, pulling numbers from spreadsheets, wastes hours every quarter. QuickBooks Online can calculate most of the return for you, if it is set up correctly.
This guide walks through filing a GST/HST return inside QuickBooks Online, from enabling sales tax tracking to submitting your final numbers to the CRA. If you have not registered for GST/HST yet, read our guide on how to register for GST/HST first, or start with the full Canadian GST/HST guide for the bigger picture.
What Does Filing GST/HST in QuickBooks Online Involve?
QuickBooks Online has a built-in Sales Tax Center that tracks tax collected and tax paid, then calculates the net amount owed to the CRA. Once your Canadian tax agency is set up, QBO generates a return-ready summary matching the CRA’s GST34 form.
This guide is for e-commerce sellers using QuickBooks Online who sync Amazon or Shopify data through A2X and want their GST/HST filings to match their books exactly, without manual recalculation each period.
Why Filing Correctly in QuickBooks Matters
A GST/HST return is only as accurate as the data behind it. If your tax liability account does not match what you actually collected across provinces, you either overpay or underpay the CRA.
Filing directly from QuickBooks Online also creates a clean audit trail. If the CRA ever requests supporting documentation, your books and your filed return will already match, transaction for transaction.
It saves real time too. Sellers who reconcile monthly instead of scrambling at filing deadlines cut their quarter-end close time significantly, since the numbers are already verified.
Step-by-Step Guide to Filing GST/HST in QuickBooks Online
Step 1: Set Up Your GST/HST Sales Tax Agency
In QuickBooks Online, go to Taxes, then Sales Tax, and add the Canada Revenue Agency as your tax agency. Enter your GST/HST registration number and select your correct filing frequency, whether monthly, quarterly, or annual.
Step 2: Confirm Your Provincial Tax Rates Are Mapped Correctly
QuickBooks needs to apply the right rate per province on every transaction. Cross-check your rate table against our GST/HST rates by province guide before your first filing period closes.
Step 3: Sync Sales Channel Data
If you sell on Amazon or Shopify, connect A2X so settlement data posts into QuickBooks Online broken out by tax collected per province. Manual entry at this stage is where most GST/HST errors start, so double-check that A2X’s tax mapping matches your QuickBooks chart of accounts.
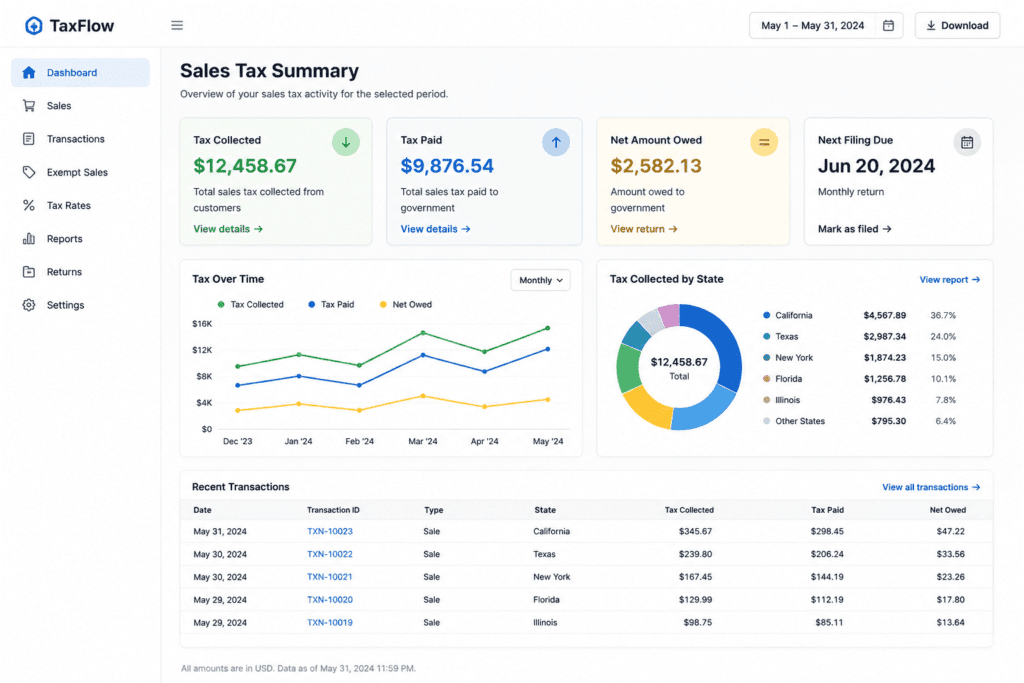
Step 4: Review the Sales Tax Center Summary
Before filing, open the Sales Tax Center and review the period summary. QuickBooks separates tax collected on sales from tax paid on eligible purchases, which forms the basis of your input tax credit calculation. For a full breakdown of what qualifies, see our guide to GST/HST input tax credits.
Step 5: Choose Your Filing Method
Decide whether you are filing under the standard method or the Quick Method before submitting. These calculate net tax differently, and choosing wrong can cost you money over a full year. Compare both in our guide on the GST/HST Quick Method versus regular method.
Step 6: File Through CRA My Business Account or NETFILE
Export your period summary from QuickBooks Online and enter the figures into the CRA’s My Business Account portal, or file directly through GST/HST NETFILE using the numbers QuickBooks generated. Keep a PDF copy of the summary attached to the filing period in QuickBooks for your records.
Step 7: Record the Payment or Refund
Once you remit payment, record it against the same tax period in QuickBooks so your liability account clears to zero. If you are owed a refund instead, record the incoming payment the same way to keep your books reconciled.
Practical Tips for Better Results
Reconcile your GST/HST liability account monthly, not just before filing. Catching a mismatch early is far easier than untangling three months of errors at once.
Common mistake: filing from a spreadsheet total instead of the QuickBooks Sales Tax Center. Manual totals drift from your books over time and create discrepancies during an audit.
Common mistake: forgetting to update A2X’s tax account mapping after adding a new sales channel or province. Review this mapping every time your business expands into a new market.
Efficiency tip: use TaxCloud alongside QuickBooks Online to automate rate calculation at checkout, so the numbers landing in your Sales Tax Center are correct before you ever open the filing screen.
Conclusion
Filing GST/HST from QuickBooks Online turns a stressful quarterly task into a routine one, as long as your tax agency setup, provincial rates, and channel sync are configured correctly from the start.
Get this right once, and every future filing becomes a five-minute review instead of a spreadsheet reconstruction. If you would rather have this handled for you, book a free consultation and we will set up your GST/HST filing workflow in QuickBooks Online.
By:

Ashfaq helps e-commerce business owners turn messy numbers into clear, reliable financials. With over 15 years of experience, he specializes in bookkeeping for Amazon and Shopify sellers, ensuring accuracy, clarity, and confident decision-making.
Categories
Latest Posts
- August 2, 2026
Amazon Seller Connector by QuickBooks: Complete Guide
- July 21, 2026
How COGS Accounting Works for Canadian FBA Sellers
Tags
A2X
Accounting Method
Amazon FBA
Amazon Marketplace Connector
Amazon Seller Central
Amazon Seller Connector
Bookkeeping Tips
Canada Tax Registration
Canadian Bookkeeping
Canadian Sales Tax
Chart of Accounts
COGS
E-Commerce
E-Commerce Bookkeeping
Finance
Financial Statements
GST/HST
Inventory
Payout Reconciliation
Profit and Loss
QuickBooks Online
Sales Tax
Sales Tax Compliance
Shopify
TaxCloud