QuickBooks Bookkeeping for Amazon FBA & Shopify | Thelonex


What Is a Chart of Accounts for E-Commerce Sellers?
- Home
- What Is a Chart of Accounts for E-Commerce Sellers?
- July 20, 2026
- 7 min read
- No Comments

What Is a Chart of Accounts for E-Commerce Sellers?
A chart of accounts is the backbone of your bookkeeping system. Get it wrong, and every report built on top of it will be wrong too.
Most e-commerce sellers start with the default QuickBooks Online chart of accounts. That default was not built for Amazon or Shopify. It has no place for marketplace fees, no split between platforms, and no dedicated COGS categories.
This guide walks through what a chart of accounts is, why the standard version fails online sellers, and how to build one that fits your business. This is part of our full e-commerce bookkeeping guide, which covers the entire bookkeeping process from setup to monthly reporting.
What Is a Chart of Accounts?
A chart of accounts is a list of every account used to record your business transactions. Each account falls into one of five categories: assets, liabilities, equity, income, and expenses.
Your profit and loss statement and balance sheet are both built directly from this list. If an account is missing or mislabeled, your reports will misstate your numbers.
Who Needs a Custom Chart of Accounts
Any Amazon FBA or Shopify seller using QuickBooks Online needs a chart of accounts adjusted for e-commerce. This especially applies to sellers who:
- Sell on more than one platform
- Want product-level or channel-level profit visibility
- Need to separate COGS from operating expenses for accurate margins
- Are preparing books for a CPA, lender, or buyer
A Simple Example
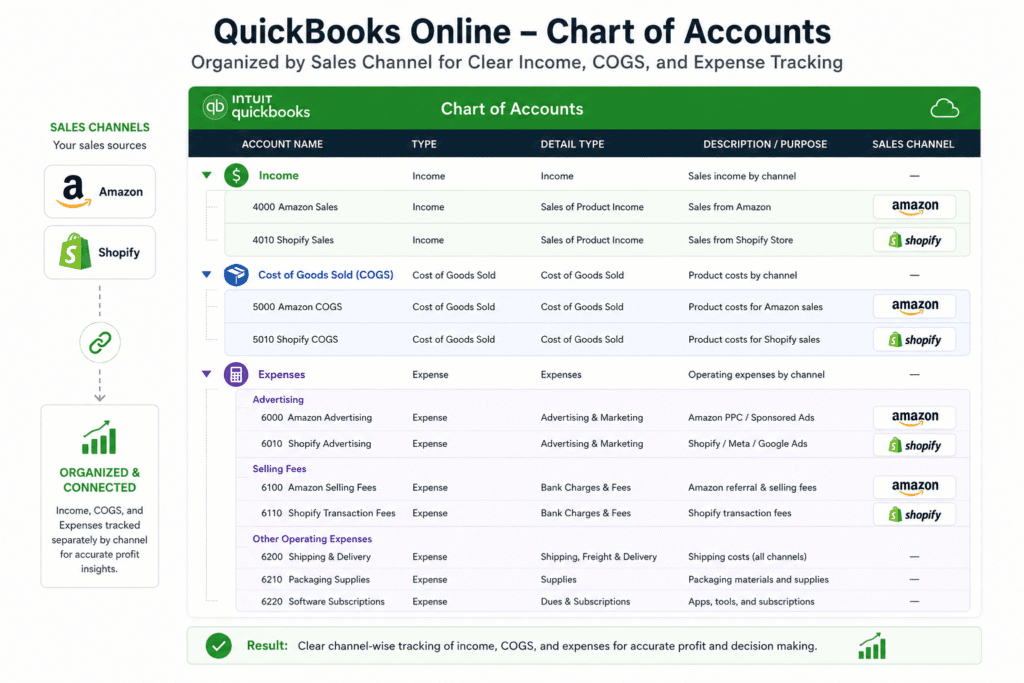
A basic e-commerce income section might look like this: “Amazon Sales,” “Shopify Sales,” “Sales Discounts,” and “Sales Refunds.” A basic COGS section might include “Product Cost,” “Inbound Freight,” and “FBA Fulfillment Fees.” Each account exists so a specific question can be answered directly from your reports, instead of pulled apart manually every time you need an answer.
Why a Proper Chart of Accounts Matters for E-Commerce
A generic chart of accounts lumps everything into broad categories like “Sales” and “Other Expenses.” That structure hides the details that actually drive profit.
It separates fees from sales. Amazon referral fees, FBA fees, and Shopify transaction fees should sit in their own expense accounts, not buried inside a single “cost of sales” line.
It supports accurate COGS. Product cost, freight, and packaging need dedicated accounts so your gross margin is real, not estimated. Our guide on calculating COGS for e-commerce sellers builds on this structure directly.
It works with A2X. A2X posts summarized settlement data into QuickBooks Online. It needs specific income, expense, and clearing accounts to map correctly. A messy chart of accounts causes mapping errors and inaccurate reports.
It scales as you grow. Adding a new sales channel or a new product line is far easier when your account structure already supports segmentation.
It makes tax season faster. A CPA can move straight to filing when income, COGS, and expenses are already categorized correctly, instead of spending billable hours reclassifying transactions first.
Sellers who never fix their chart of accounts usually notice the cost later, when a bookkeeper or accountant has to rebuild months of transactions before they can even start real analysis. Fixing the structure early avoids that cleanup entirely.
Step-by-Step Guide to Building an E-Commerce Chart of Accounts
Step 1: Start With Standard Categories
Begin with the five core categories: assets, liabilities, equity, income, and expenses. Keep the top-level structure simple. Detail belongs in sub-accounts, not in the main list.
Step 2: Add Channel-Specific Income Accounts
Create separate income accounts for each sales channel, such as “Amazon Sales” and “Shopify Sales.” This lets you see revenue by platform at a glance, without running a separate report for each one.
Step 3: Break Out Cost of Goods Sold
Add dedicated COGS accounts for product cost, inbound freight, and FBA fulfillment fees. Keep COGS separate from operating expenses like advertising or software subscriptions. This split is what makes your gross margin accurate.
Many sellers mistakenly file Amazon storage fees or advertising costs under COGS. Storage and advertising are operating expenses, not product costs. Keeping this line clear prevents your gross margin from looking worse, or better, than it actually is.
Step 4: Track Marketplace Fees Separately
Create expense accounts for referral fees, FBA storage fees, Shopify transaction fees, and payment processor fees. Grouping these together hides which platform is actually cutting into your margin the most.
Step 5: Add Clearing Accounts for A2X
A2X needs clearing accounts to hold funds between the time a sale happens and the time it settles into your bank account. Set these up as “Other Current Asset” accounts, one per platform, so payouts reconcile cleanly.
Step 6: Customize for Multi-Channel Selling
If you sell on Amazon, Shopify, and other channels, mirror the same account structure across each one. Consistent naming makes consolidated reporting far easier when you review your full business performance.
Step 7: Set Up Sub-Accounts, Not New Top-Level Accounts
When you need more detail, add a sub-account under an existing category instead of creating a new top-level account. For example, “Amazon FBA Fees” and “Amazon Referral Fees” can sit as sub-accounts under a parent “Amazon Fees” account. This keeps your profit and loss statement readable while still preserving detail underneath.
Practical Tips for Better Results
Do not over-complicate the list. A chart of accounts with hundreds of accounts becomes unusable. Aim for enough detail to answer real questions, not every possible question.
Use consistent naming conventions. Label accounts the same way across channels, such as “Amazon COGS” and “Shopify COGS,” so reports stay easy to compare side by side.
Review it once a year. As your product line or sales channels change, your chart of accounts should change with them. An annual review keeps it useful instead of outdated.
Start from a proven template. Building a chart of accounts from scratch takes time and invites mistakes. Download our free e-commerce chart of accounts template from the downloads library and customize it for your business.
Avoid mixing personal categories into the business list. Keep the chart of accounts strictly for business transactions. Personal expenses should never appear here, even temporarily.
A common mistake is deleting default QuickBooks accounts instead of making them inactive. Deleting accounts with historical transactions can distort prior reports. Mark unused accounts inactive instead.
Number your accounts for order control. Assigning number ranges to each category, such as 4000s for income and 5000s for COGS, keeps your chart of accounts sorted logically as it grows, rather than alphabetically scattered.
Get a second review before go-live. Once your chart of accounts is built, have a QuickBooks-certified bookkeeper review it before you start posting live transactions. Catching a structural mistake in week one is far cheaper than fixing a full year of miscategorized data later.
Conclusion
Your chart of accounts sets the foundation for every report your business relies on. A structure built for Amazon and Shopify, not a generic template, gives you accurate COGS, clear fee tracking, and reports that actually reflect how your business runs.
A well-built chart of accounts also makes it far easier to onboard a bookkeeper, accountant, or A2X connection later, since the structure they need is already in place instead of being built around existing mess.
Once your chart of accounts is in place, the next step is deciding how to time your revenue and expenses. See our guide on cash vs accrual accounting for e-commerce sellers to choose the right method for your business.
Need help setting this up correctly the first time? Book a free consultation and our QuickBooks-certified team will build it for you.
Categories
Latest Posts
- August 2, 2026
Amazon Seller Connector by QuickBooks: Complete Guide
- July 21, 2026
How COGS Accounting Works for Canadian FBA Sellers
Tags
A2X
Accounting Method
Amazon FBA
Amazon Marketplace Connector
Amazon Seller Central
Amazon Seller Connector
Bookkeeping Tips
Canada Tax Registration
Canadian Bookkeeping
Canadian Sales Tax
Chart of Accounts
COGS
E-Commerce
E-Commerce Bookkeeping
Finance
Financial Statements
GST/HST
Inventory
Payout Reconciliation
Profit and Loss
QuickBooks Online
Sales Tax
Sales Tax Compliance
Shopify
TaxCloud