

A2X and Sales Tax: Track Tax Correctly in QuickBooks
- Home
- A2X and Sales Tax: Track Tax Correctly in QuickBooks
- July 4, 2026
- 7 min read
- No Comments
A2X and Sales Tax: Track Tax Correctly in QuickBooks
Sales tax is one of the most mishandled categories in ecommerce bookkeeping. It is not income. It does not belong in your revenue account. And if it’s not tracked separately from the start, your QuickBooks reports will misstate both your revenue and your tax liability every single month.
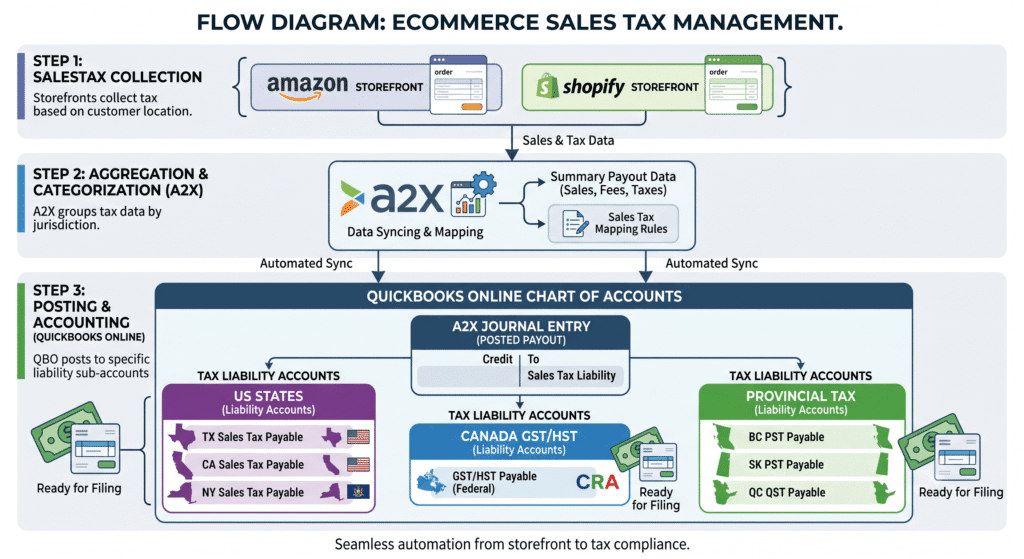
A2X can capture sales tax data from every Amazon and Shopify settlement automatically — but only if your account mapping tells it where to put it. This guide shows you exactly how to set that up correctly for sellers in the US and Canada.
By the end, you will know how sales tax flows from your storefront through A2X and into QuickBooks, and how to keep that data clean enough to use for filing.
What Is A2X Sales Tax Tracking?
A2X sales tax tracking is the process of mapping the sales tax portion of each settlement to a dedicated liability account in QuickBooks, separate from your revenue. Instead of one deposit that blends sales and tax together, A2X splits the tax out automatically.
This matters for two reasons. First, your revenue figures stay accurate. Sales tax you collected is not money you earned. Mixing it into income inflates your profit numbers. Second, your liability account shows exactly what you owe to each tax authority at any point in time.
This guide connects directly to the A2X chart of accounts mapping process. If you haven’t set up your tax liability accounts yet, do that first before working through the steps here.
Why Sales Tax Tracking Matters for US and Canadian Sellers
US sellers face sales tax obligations in any state where they have economic nexus, which is triggered by crossing revenue or transaction thresholds. After the South Dakota v. Wayfair decision, most states enforce economic nexus rules, meaning remote sellers can owe tax in states where they have never set foot.
Canadian sellers face GST/HST obligations at the federal level and, in some provinces, additional provincial sales tax (PST). Cross-border sales add another layer if you sell into the US from Canada or vice versa.
In both countries, accurate books are the starting point for accurate filings. A2X gives you the data. Tools like TaxCloud handle the filing calculations. But if the data entering QuickBooks is wrong, everything downstream is wrong too.
If sales tax compliance across multiple states or provinces is already taking time you don’t have, our sales tax services team handles registrations, filings, and ongoing compliance so you can focus on the business.
How Sales Tax Flows Through A2X Into QuickBooks
Amazon Marketplace Facilitator Tax
In most US states, Amazon collects and remits sales tax on behalf of third-party sellers through marketplace facilitator laws. This means Amazon handles the tax payment — you don’t remit it separately in those states.
However, the tax amount still appears in your settlement report. A2X needs to capture this correctly in QuickBooks, even though you’re not remitting it yourself, so your revenue and expense figures stay accurate.
Map Amazon’s marketplace facilitator tax to a separate income offset or pass-through account, not your main sales account. This keeps your revenue figure clean and documents that the tax passed through Amazon, not directly to you.
Shopify Sales Tax Collected
Unlike Amazon, Shopify does not automatically remit sales tax on your behalf. If you are registered to collect sales tax in a state or province, you collect it through Shopify and remit it yourself, or through a tool like TaxCloud.
A2X maps this tax to the liability account you designate during Shopify setup. If you sell in multiple states, you may need a separate liability account per state to track what you owe each jurisdiction accurately.
Canadian GST/HST and Provincial Tax
For Canadian sellers, GST/HST collected should map to a GST/HST payable liability account. Provincial sales tax, where applicable, should map to its own separate account.
If you sell in both the US and Canada, keep your US and Canadian tax liability accounts completely separate. Blending them makes filing in either country harder and creates confusion for your accountant or tax preparer.
Step-by-Step Guide: Setting Up A2X Sales Tax Tracking
Step 1: Create Dedicated Tax Liability Accounts in QuickBooks
Before mapping anything in A2X, open your QuickBooks chart of accounts and create the tax liability accounts you need. At minimum, create a separate account for each tax type you collect.
- US sales tax payable (or one account per state if you track by state)
- Canadian GST/HST payable
- Provincial sales tax payable, if applicable
- Amazon marketplace facilitator tax pass-through, if you sell on Amazon
Name each account clearly. Vague names like “Tax Collected” create confusion during filing and make audits harder to support.
Step 2: Map Each Tax Category in A2X
Inside A2X, map every tax transaction type to the correct QuickBooks liability account. Do not map tax to your sales income account under any circumstances.
If A2X surfaces multiple tax line items in a settlement, map each one separately. Amazon settlements, for example, may list marketplace facilitator tax, shipping tax, and gift wrap tax as distinct items.
Step 3: Separate Tax by Jurisdiction if Required
If you file separately in multiple states or provinces, set up separate liability accounts for each one and map accordingly. This is more work upfront but saves significant time during filing.
If you use TaxCloud to calculate and file your sales tax obligations, make sure the accounts in QuickBooks use the same naming conventions or codes TaxCloud expects, so the data flows cleanly between both tools.
Step 4: Post a Test Settlement and Review
After mapping, post one settlement and check the resulting journal entry. Every tax line should land in a liability account, not income. The total in your tax liability account should match the tax collected figure in your settlement report.
If anything posts to the wrong account, fix the mapping before the next settlement. See our chart of accounts mapping guide if you need to rework the account structure before mapping.
Step 5: Reconcile Your Tax Liability Account Monthly
At the end of each month, check your tax liability account balance in QuickBooks against what you’ve actually collected. The balance should represent tax you have collected but not yet remitted.
When you file and pay, post the payment against this liability account so the balance returns toward zero. If the balance keeps growing without payments, either filings are overdue or mapping is sending non-tax amounts into the account.
Practical Tips for Better Results
- Never map sales tax to an income account. This is the most common mistake and the hardest to unwind months later.
- For Amazon sellers, keep marketplace facilitator tax separate from tax you collect and remit yourself. These are fundamentally different obligations and should not share an account.
- Review your tax mapping whenever you register in a new state or province. New registrations mean new obligations, and new obligations need new accounts.
- Use TaxCloud data to cross-check your QuickBooks liability balance. If the two tools disagree, the discrepancy is almost always a mapping issue on the QuickBooks side.
- Post tax payments against the liability account, not as an expense. Expensing sales tax payments distorts your profit and loss statement.
- If your A2X settlement isn’t showing tax data where you expect it, check for sync issues first. Our guide to common A2X sync errors and how to fix them covers missing data scenarios.
Conclusion
Sales tax tracking in A2X is not complicated once your liability accounts are set up correctly. The data flows automatically from every settlement into the right place in QuickBooks, and your liability balance stays accurate month after month.
For the full A2X connection process, see our complete A2X tutorial. If you’re also managing multi-state or cross-border registrations and filings, our sales tax services handle the compliance side so A2X just needs to feed the data.
Want your A2X tax mapping reviewed and set up correctly? Book a free consultation with Thelonex and let a QuickBooks-certified team configure it from the start.
By:

Ashfaq helps e-commerce business owners turn messy numbers into clear, reliable financials. With over 15 years of experience, he specializes in bookkeeping for Amazon and Shopify sellers, ensuring accuracy, clarity, and confident decision-making.
Categories
Latest Posts
- August 2, 2026
Amazon Seller Connector by QuickBooks: Complete Guide
- July 21, 2026
How COGS Accounting Works for Canadian FBA Sellers
Tags
A2X
Accounting Method
Amazon FBA
Amazon Marketplace Connector
Amazon Seller Central
Amazon Seller Connector
Bookkeeping Tips
Canada Tax Registration
Canadian Bookkeeping
Canadian Sales Tax
Chart of Accounts
COGS
E-Commerce
E-Commerce Bookkeeping
Finance
Financial Statements
GST/HST
Inventory
Payout Reconciliation
Profit and Loss
QuickBooks Online
Sales Tax
Sales Tax Compliance
Shopify
TaxCloud