QuickBooks Bookkeeping for Amazon FBA & Shopify | Thelonex


Here’s Your Complete A2X Tutorial for QuickBooks
- Home
- Here’s Your Complete A2X Tutorial for QuickBooks
- June 24, 2026
- 7 min read
- No Comments
Here’s Your Complete A2X Tutorial for QuickBooks
If you sell on Amazon or Shopify, your bank deposit never matches your sales. One payout might cover two weeks of orders, minus fees, refunds, and reserves. This A2X tutorial shows you exactly how to fix that.
A2X breaks down every payout into clean, accurate entries inside QuickBooks Online. Once it’s set up, you stop guessing and start trusting your numbers.
By the end of this guide, you will know what A2X does, why it matters for your books, and how to connect it to QuickBooks Online step by step.
What Is A2X?
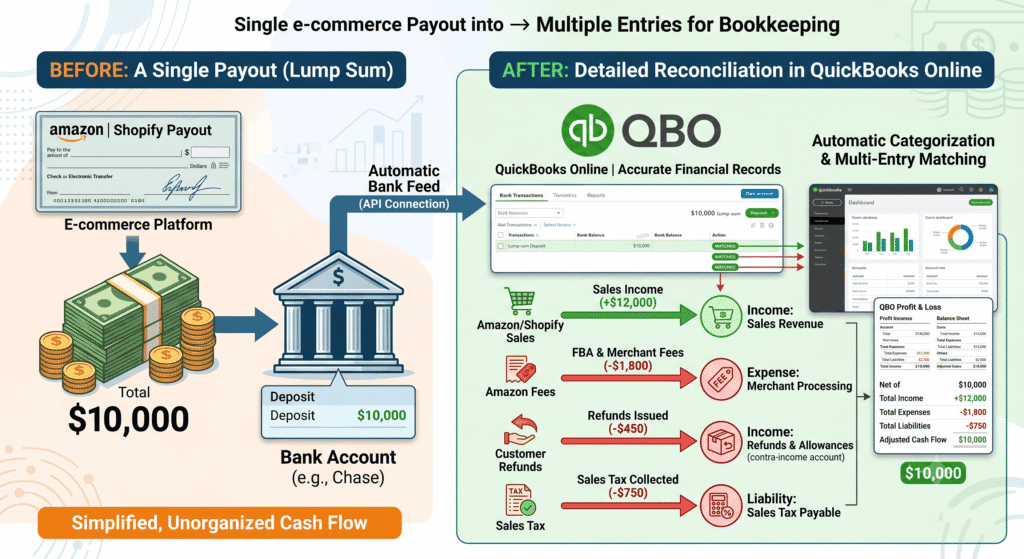
A2X is a software tool that connects your Amazon or Shopify sales channel to QuickBooks Online. It takes your messy payout data and turns it into organized journal entries.
Instead of one lump-sum deposit, A2X separates sales, refunds, shipping, fees, and sales tax into the right accounts. It matches your QuickBooks entry to the exact amount that lands in your bank.
A2X is built for online sellers, not accountants. You do not need a finance background to use it. If you sell on Amazon or Shopify and use QuickBooks Online, A2X is made for your business.
It works for sellers in the United States and Canada, including those managing multiple states, provinces, or currencies.
Why A2X Matters for Your Bookkeeping
Manual reconciliation eats hours every month. You copy numbers from a settlement report, try to match them to a bank deposit, and hope you didn’t miss a fee category. A2X removes that guesswork.
Here is what changes once A2X is running correctly:
- Your profit and loss statement reflects reality. Sales, fees, and refunds post to separate accounts, so you see your true margin instead of a misleading deposit total.
- Your bank reconciliation takes minutes, not hours. Each A2X entry matches your actual payout, so QuickBooks reconciles cleanly.
- Your books stay audit-ready. If a CPA or tax authority asks for backup, every transaction traces back to a settlement report instead of a single unexplained deposit.
- You catch problems early. Sudden spikes in refunds or fees show up immediately in your reports, not three months later during tax season.
This matters even more once you sell in multiple US states or into Canada. Clean A2X data feeds directly into your sales tax tracking — see our guide on how A2X tracks sales tax in QuickBooks, or talk to our team about full sales tax compliance services if you’d rather hand the filing off entirely.
Step-by-Step A2X Tutorial: Connect A2X to QuickBooks Online
Follow these steps in order. Each one builds on the last.
Step 1: Create Your A2X Account and Connect Your Sales Channel
Sign up for A2X and choose your sales channel, either Amazon Seller Central or Shopify. A2X asks for permission to read your sales and payout data.
Grant the connection. A2X pulls in your historical settlement data automatically, so you don’t need to enter anything by hand. If you sell on Amazon, follow our detailed A2X setup guide for Amazon sellers. If you sell on Shopify, use our A2X Shopify setup guide instead — each platform has a few different settings worth getting right from the start.
Step 2: Connect A2X to QuickBooks Online
Inside your A2X dashboard, select QuickBooks Online as your accounting platform. Log in with your QuickBooks credentials and authorize the connection.
This link lets A2X post journal entries directly into your QuickBooks ledger. No exporting or importing files required. If you haven’t set up QuickBooks Online yet, our QuickBooks setup service configures an e-commerce-ready chart of accounts before A2X ever connects.
Step 3: Map Your Chart of Accounts
This is the step most sellers rush, and it causes the most errors later. A2X needs to know where each transaction type belongs in QuickBooks.
Map your sales, refunds, shipping income, Amazon or Shopify fees, and sales tax to the correct QuickBooks accounts. If an account does not exist yet, create it before mapping.
Take your time here. Accurate mapping now means accurate reports every month after. For the full breakdown of which account each transaction type belongs in, see our dedicated guide to A2X chart of accounts mapping.
Step 4: Choose Your Posting Settings
A2X lets you choose how summaries post: by settlement period or by a custom schedule. Most sellers use one summary entry per settlement, which keeps QuickBooks clean and easy to reconcile. If you’re unsure which setting fits your store, our comparison of A2X summary versus detail posting walks through the trade-offs.
Decide whether you want invoice-level detail or a single summary line. Summary posting works well for most small to mid-size sellers.
Step 5: Review and Post Your First Settlement
Before posting, review the settlement summary inside A2X. Check that the total matches your actual bank deposit.
Once it looks correct, post the entry. A2X creates the journal entry automatically, broken into your mapped accounts. If a sync fails or the totals look wrong, check our guide to common A2X sync errors and how to fix them before troubleshooting further.
Step 6: Reconcile in QuickBooks Online
Open your bank feed in QuickBooks. Match the A2X journal entry to the deposit that hit your bank account.
If the numbers match, your reconciliation is done. If they don’t, check your account mapping from Step 3 first. That’s where most mismatches start. For a deeper walkthrough of matching Amazon settlements specifically, including reserve holds and partial payouts, see how to reconcile Amazon settlements using A2X.
Practical Tips for Better Results
A few habits separate sellers with clean books from sellers who fight their numbers every month.
- Map accounts before your first transaction posts. Going back to fix mapping after months of entries means redoing past reconciliations. Get it right from day one — our chart of accounts mapping guide covers this in detail.
- Reconcile every month, not every quarter. Small errors are easy to catch and fix early. They become time-consuming once they pile up across several settlement periods.
- Watch for currency and tax account changes. If you start selling into a new state or Canadian province, update your A2X tax mapping right away. See our guide on A2X sales tax tracking for how this data flows into your filings.
- Avoid mixing personal and business transactions in the same QuickBooks file. A2X works best with a clean, dedicated business ledger. Mixed transactions make every reconciliation harder.
- Don’t skip the settlement review step. Posting without checking totals first is the fastest way to introduce silent errors into your books.
- Choose the right A2X plan for your order volume. Pricing scales with transaction volume, so check our breakdown of A2X pricing and plans before you commit to a tier.
If your store is also registered to collect sales tax in multiple states or provinces, keeping A2X mapping current becomes part of staying compliant, not just part of bookkeeping.
Conclusion
A2X turns confusing Amazon and Shopify payouts into clean QuickBooks entries. Once it’s connected and mapped correctly, your books update almost automatically every month.
This setup pays off long after the initial work. Accurate books save time at tax season, support better business decisions, and hold up if you’re ever audited.
If you want this handled the first time correctly, without trial and error, talk to a QuickBooks-certified team that manages monthly bookkeeping and A2X setup every day. Book a free consultation with Thelonex and get your A2X connection configured right
By:

Ashfaq helps e-commerce business owners turn messy numbers into clear, reliable financials. With over 15 years of experience, he specializes in bookkeeping for Amazon and Shopify sellers, ensuring accuracy, clarity, and confident decision-making.
Categories
Latest Posts
- August 2, 2026
Amazon Seller Connector by QuickBooks: Complete Guide
- July 21, 2026
How COGS Accounting Works for Canadian FBA Sellers
Tags
A2X
Accounting Method
Amazon FBA
Amazon Marketplace Connector
Amazon Seller Central
Amazon Seller Connector
Bookkeeping Tips
Canada Tax Registration
Canadian Bookkeeping
Canadian Sales Tax
Chart of Accounts
COGS
E-Commerce
E-Commerce Bookkeeping
Finance
Financial Statements
GST/HST
Inventory
Payout Reconciliation
Profit and Loss
QuickBooks Online
Sales Tax
Sales Tax Compliance
Shopify
TaxCloud