QuickBooks Bookkeeping for Amazon FBA & Shopify | Thelonex


Here’s How to Set Up A2X for Amazon Sellers
- Home
- Here’s How to Set Up A2X for Amazon Sellers
- June 24, 2026
- 6 min read
- No Comments
Here’s How to Set Up A2X for Amazon Sellers
Your Amazon payout lands in your bank account as one number. It is not your sales. It is not your profit. It is fees, refunds, reserves, and reimbursements rolled into a single deposit that tells you nothing useful.
A2X fixes this by breaking every Amazon settlement into clean line items inside QuickBooks Online. This guide walks through the exact setup, built for FBA and Seller Central sellers in the US and Canada.
By the end, you will have A2X connected, your accounts mapped correctly, and your first settlement reconciled.
What Is A2X Setup for Amazon Sellers?
A2X setup for Amazon is the process of linking your Seller Central account to A2X, then linking A2X to QuickBooks Online. Once connected, A2X reads your settlement reports and turns them into organized journal entries.
This setup is for any Amazon seller using QuickBooks Online, whether you sell through FBA, FBM, or both. It works whether you sell only in the US, only in Canada, or across both marketplaces. If you want the broader overview of how A2X connects to QuickBooks before diving into Amazon-specific steps, start with our complete A2X tutorial.
You do not need bookkeeping experience to complete it. You do need about an hour of focused time and access to your Seller Central and QuickBooks logins.
Why A2X Setup Matters for Amazon Sellers
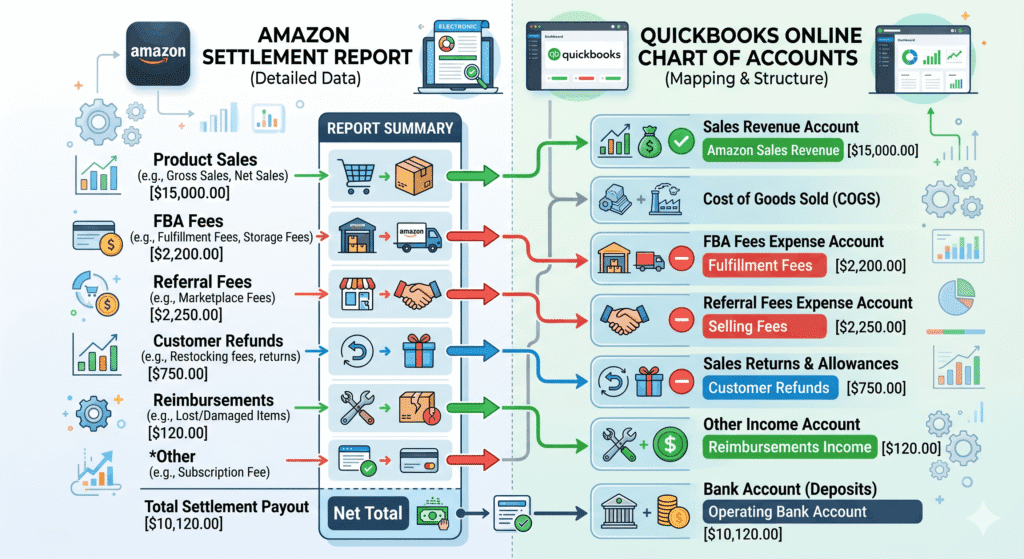
Amazon settlements are dense. A single settlement can include product sales, FBA fulfillment fees, referral fees, storage fees, refunds, reimbursements, and sales tax collected on Amazon’s behalf.
Without A2X, most sellers record the payout as a single deposit. This hides your real margin. Amazon fees often run 15% or more of revenue, and that detail disappears in a lump sum.
With A2X set up correctly, every fee type lands in its own account. You see exactly what Amazon charged you, not just what you received. This makes your profit and loss statement trustworthy.
It also protects you at tax time. If you sell into multiple US states or into Canada, accurate settlement data keeps your sales tax liability correct — see our guide on A2X sales tax tracking, or let our sales tax services team handle registrations and filings directly.
Step-by-Step Guide: Setting Up A2X for Amazon
Step 1: Connect Amazon Seller Central to A2X
Log in to your A2X account and select Amazon as your sales channel. A2X will prompt you to authorize access to your Seller Central account.
Grant the permissions requested. A2X needs read access to your settlement reports to pull historical and ongoing data automatically.
Step 2: Connect A2X to QuickBooks Online
From your A2X dashboard, choose QuickBooks Online as your accounting connection. Log in with your QuickBooks credentials and confirm the authorization.
This link allows A2X to post journal entries directly into your ledger, so you never need to export or upload files manually.
Step 3: Map Your Amazon Accounts
This step decides whether your reports will be accurate. Map each Amazon transaction type to the correct QuickBooks account. For the full breakdown of which account each fee type belongs in, follow our dedicated guide to A2X chart of accounts mapping alongside these Amazon-specific notes.
Product sales should map to a sales income account. FBA fees, referral fees, and storage fees should each map to their own expense account, not one combined “Amazon fees” bucket if you want detailed reporting. Refunds map to a contra-revenue account. Reimbursements from Amazon for lost or damaged inventory map to a separate income or other income account, not sales.
Create any missing accounts in QuickBooks before finishing this step.
Step 4: Choose Your Settlement Posting Frequency
Amazon settles payouts roughly every two weeks, though frequency can vary. Decide whether A2X should post a summary entry per settlement period, which is the standard choice for most sellers.
This keeps your QuickBooks file from filling up with hundreds of small line items, while still giving you accurate totals by category.
Step 5: Post Your First Amazon Settlement
Before posting, review the settlement summary inside A2X. Confirm the net total matches the deposit that hit your bank account.
Once confirmed, post the entry. A2X creates a journal entry in QuickBooks, split across the accounts you mapped in Step 3.
Step 6: Reconcile the Settlement in QuickBooks
Open your QuickBooks bank feed and match the A2X journal entry to your actual bank deposit. If the totals align, the reconciliation is complete.
If they do not match, the cause is almost always a mapping issue from Step 3, or a settlement that was edited after posting. This covers a single, straightforward settlement. For the recurring monthly process, including reserve holds and settlements that span two months, see our full guide to reconciling Amazon settlements with A2X.
Practical Tips for Better Results
- Separate FBA fees from referral fees in your mapping. Combining them into one account hides which cost is actually rising when your margin drops.
- Treat inventory reimbursements as a separate line, not sales. Recording them as sales inflates your revenue and distorts your real margins.
- Reconcile after every settlement, not once a month. Amazon settles roughly every two weeks. Waiting longer makes errors harder to trace back to a specific period.
- Watch your sales tax mapping if you sell in multiple states. Amazon collects and remits tax on your behalf in many states, but the data still needs to flow correctly into QuickBooks. Our guide to A2X and sales tax tracking covers this in detail.
- Avoid changing account mappings mid-month. Switch mappings only between settlement periods, so historical entries stay consistent and comparable.
- If a settlement fails to sync or posts a wrong total, don’t guess at the fix. Check our list of common A2X sync errors and how to fix them
- If you sell in both the US and Canada, map each marketplace separately. This keeps currency and tax reporting clean instead of blended.
Conclusion
A2X setup turns confusing Amazon payouts into accurate QuickBooks entries you can actually trust. The mapping step takes the most care, but once it’s right, every future settlement posts correctly on its own.
For the full process of connecting A2X to QuickBooks, regardless of platform, see our complete A2X tutorial. If your store also collects sales tax across multiple states or provinces, our sales tax services keep that side compliant too.
Want this set up correctly the first time? Book a free consultation with Thelonex and let a QuickBooks-certified team handle your A2X setup.
By:

Ashfaq helps e-commerce business owners turn messy numbers into clear, reliable financials. With over 15 years of experience, he specializes in bookkeeping for Amazon and Shopify sellers, ensuring accuracy, clarity, and confident decision-making.
Categories
Latest Posts
- August 2, 2026
Amazon Seller Connector by QuickBooks: Complete Guide
- July 21, 2026
How COGS Accounting Works for Canadian FBA Sellers
Tags
A2X
Accounting Method
Amazon FBA
Amazon Marketplace Connector
Amazon Seller Central
Amazon Seller Connector
Bookkeeping Tips
Canada Tax Registration
Canadian Bookkeeping
Canadian Sales Tax
Chart of Accounts
COGS
E-Commerce
E-Commerce Bookkeeping
Finance
Financial Statements
GST/HST
Inventory
Payout Reconciliation
Profit and Loss
QuickBooks Online
Sales Tax
Sales Tax Compliance
Shopify
TaxCloud