QuickBooks Bookkeeping for Amazon FBA & Shopify | Thelonex


Here’s How to Map A2X to Your Chart of Accounts
- Home
- Here’s How to Map A2X to Your Chart of Accounts
- June 24, 2026
- 6 min read
- No Comments
Here’s How to Map A2X to Your Chart of Accounts
Most A2X problems trace back to one step: account mapping. Get it wrong, and every settlement that posts afterward carries the same mistake.
This guide walks through exactly which QuickBooks account each Amazon or Shopify transaction type belongs in, so your reports are accurate from the very first entry.
By the end, you will know how to structure your chart of accounts for A2X and avoid the mapping mistakes that cause messy reconciliations later.
What Is A2X Chart of Accounts Mapping?
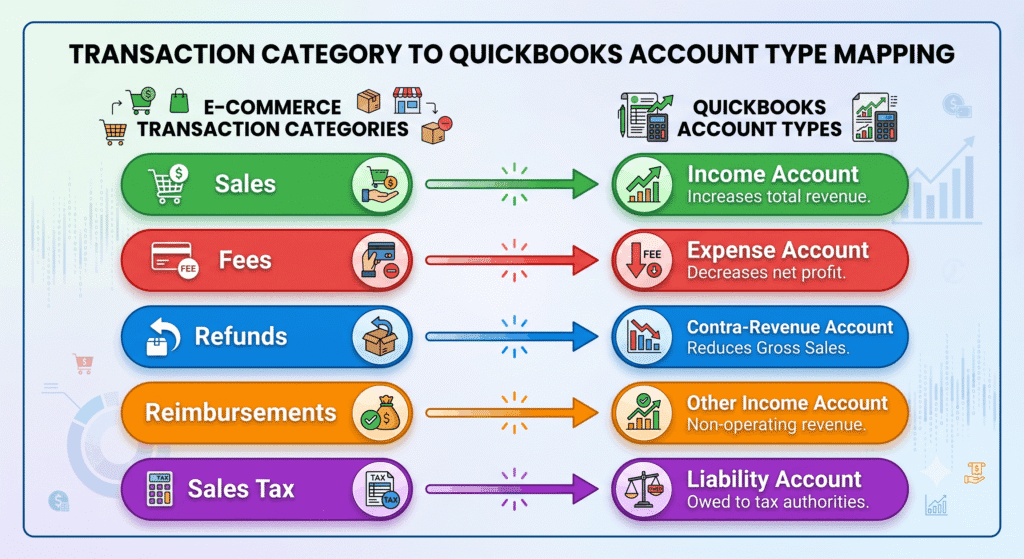
A2X chart of accounts mapping is the process of telling A2X which QuickBooks Online account each type of transaction should post to. This includes sales, refunds, shipping, fees, reimbursements, and tax.
This step happens during initial setup, whether you are connecting Amazon or Shopify. It is the bridge between A2X’s settlement data and your QuickBooks ledger.
This guide is for any seller using A2X with QuickBooks Online who wants their profit and loss statement to reflect what actually happened in their store, not a guess based on a lump-sum deposit.
Why Chart of Accounts Mapping Matters
Mapping decides what your financial reports actually show you. Map two different fee types to the same account, and you lose the ability to see which one is rising.
Map a reimbursement as sales, and your revenue looks higher than it really is. Map a refund to the wrong account, and your margin calculation is off without any obvious reason why.
Good mapping gives you reports you can act on. You can see exactly how much you paid in fulfillment fees this month versus last month. You can see your true refund rate. You can see your real margin after every cost is accounted for.
It also matters for compliance. Sales tax collected needs its own liability account, separate from revenue, to stay accurate for filing — see our guide on A2X sales tax tracking for how this connects to tools like TaxCloud.
Step-by-Step Guide to Chart of Accounts Mapping
Step 1: Audit Your Existing Chart of Accounts
Before mapping anything, open your QuickBooks chart of accounts and see what already exists. Many sellers start with a generic chart of accounts that was never built for e-commerce.
List out what you have for income, cost of goods sold, and operating expenses. You will likely need to add several new accounts before mapping can be accurate.
Step 2: Create Dedicated Income Accounts
Set up a sales income account separate from any reimbursement or other income account. If you sell on more than one channel, consider a sales account per channel, such as Amazon Sales and Shopify Sales, so you can compare performance.
Create a contra-revenue account for refunds and a separate one for discounts. These should reduce your gross sales figure, not blend into expenses.
Step 3: Create Dedicated Expense Accounts for Fees
This is where most sellers under-build their chart of accounts. Create separate expense accounts for each major fee category instead of one combined “platform fees” account.
- Referral or transaction fees
- Fulfillment fees (FBA fulfillment, or shipping fees for Shopify)
- Storage fees
- Advertising or sponsored product spend
- Payment processing fees (for each gateway, if you use more than one)
If you are setting this up specifically for Amazon, see our A2X Amazon setup guide for which fee categories Amazon settlements typically include. If you are setting this up for Shopify, our A2X Shopify setup guide covers gateway-specific fee mapping.
Step 4: Map Refunds and Reimbursements Separately
Refunds should map to your contra-revenue account, reducing gross sales. Reimbursements, such as Amazon paying you back for lost or damaged inventory, should map to a separate other income account.
These are not the same thing. A refund means you gave money back to a customer. A reimbursement means the platform paid you. Mixing them into one account makes your revenue numbers misleading.
Step 5: Map Sales Tax to a Liability Account
Sales tax collected from customers is not your money. It belongs to the state, province, or tax authority you collected it for. Map it to a sales tax payable liability account, not to income.
This keeps your books clean and makes filing easier, whether you handle it yourself in TaxCloud or work with a team that manages sales tax services on your behalf.
Step 6: Set Up a Clearing Account for Settlement Timing
Settlement periods do not always align perfectly with your bank deposit dates. A clearing account, sometimes called an undeposited funds or transit account, holds the settlement total until the matching bank deposit arrives.
This prevents timing mismatches from making your reconciliation look broken when nothing is actually wrong. The entry simply hasn’t cleared the bank yet.
Step 7: Test Mapping With Your First Settlement
Once mapping is complete, post one settlement and review the resulting journal entry line by line. Confirm every amount landed in the account you expected.
If something looks off, fix the mapping before posting a second settlement. For ongoing reconciliation once mapping is confirmed working, see our guide to reconciling Amazon settlements with A2X.
Practical Tips for Better Results
- Build your chart of accounts before connecting A2X, not after. Mapping into a half-built chart of accounts means revisiting every setting later.
- Avoid generic catch-all accounts. A single “Amazon fees” or “Shopify fees” account hides exactly the detail that makes reports useful.
- Keep tax liability accounts separate by jurisdiction if you operate in both the US and Canada. This avoids blending GST/HST with US state sales tax in your filings.
- Review your mapping any time you add a new sales channel or payment gateway. New transaction types need new mapping decisions, not a default guess.
- If a settlement posts with mismatched totals, check mapping before assuming a software bug. Our guide to common A2X sync errors and how to fix them walks through the usual causes.
- Decide on summary versus detail posting before finalizing mapping. The choice affects how granular your mapped categories need to be — see our comparison of A2X summary versus detail posting to decide which fits your store.
Conclusion
Chart of accounts mapping is the single step that determines whether your A2X reports are useful or misleading. It takes more care upfront than any other part of setup, but it only needs to be done right once.
For the full connection process from start to finish, see our complete A2X tutorial. If you’re setting up a new QuickBooks file alongside A2X, our QuickBooks setup service builds an e-commerce-ready chart of accounts before A2X ever connects.
Want a team to map this correctly the first time? Book a free consultation with Thelonex and skip the trial and error.
By:

Ashfaq helps e-commerce business owners turn messy numbers into clear, reliable financials. With over 15 years of experience, he specializes in bookkeeping for Amazon and Shopify sellers, ensuring accuracy, clarity, and confident decision-making.
Categories
Latest Posts
- August 2, 2026
Amazon Seller Connector by QuickBooks: Complete Guide
- July 21, 2026
How COGS Accounting Works for Canadian FBA Sellers
Tags
A2X
Accounting Method
Amazon FBA
Amazon Marketplace Connector
Amazon Seller Central
Amazon Seller Connector
Bookkeeping Tips
Canada Tax Registration
Canadian Bookkeeping
Canadian Sales Tax
Chart of Accounts
COGS
E-Commerce
E-Commerce Bookkeeping
Finance
Financial Statements
GST/HST
Inventory
Payout Reconciliation
Profit and Loss
QuickBooks Online
Sales Tax
Sales Tax Compliance
Shopify
TaxCloud